Quality of life for the user is the baseline for all we do. Gaea features a large array of unobtrusive (and sometimes even hidden) features that can go a long way towards making your workflow more efficient.
Node Management
Quick Create
To create your first node, right-click in the graph and type the name of the node you want to create. Then hit Enter. The node will be created at the cursor location. You can also press TAB to search for nodes.
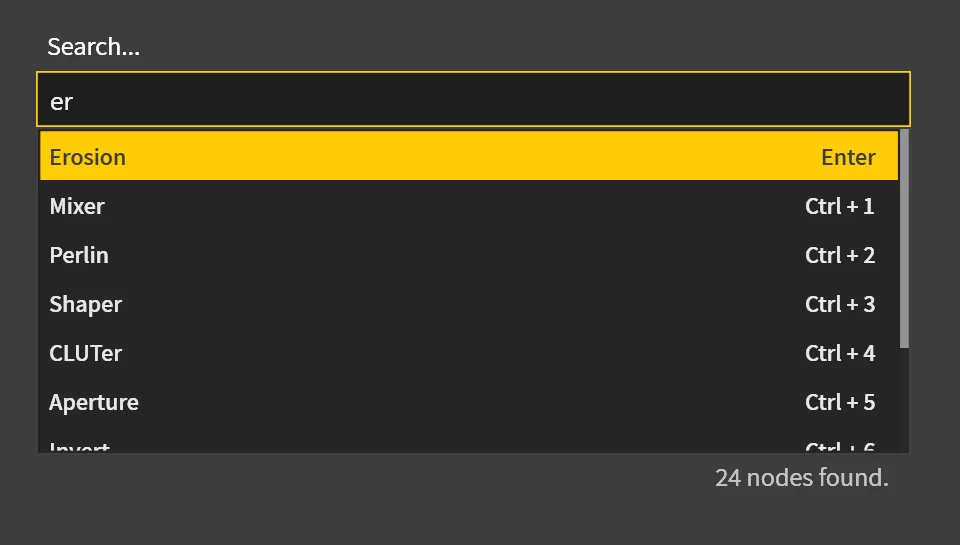
Next, rather than setting up the next node in a similar manner and then connecting it manually, you can drag a connection into empty space and use the Quick Create menu. You can click on a particular node name from the Quick Create menu, or you can type in a node name which will show the list of matching nodes. Selecting a node from this list connects to your previous node.
The Quick Create menu can also show suggestions based on your previous patterns.
See Predictive System for information on how Gaea suggests nodes.
Drop Create
All other graph applications require you to drop the node, connect it manually, and then organize as needed. Gaea does that for you! Just drop the node on another node and they'll be connected and auto-organized.
Dragging a node from the Toolbox and dropping it on an existing node will automatically connect it to that node's primary output. If another node already exists, the new node will be automatically organized for you.
Interject Node
Drop Interject
If you hold Shift and drop a node on an existing node, the new node will interject itself between all the outgoing primary connections of the node.
Drag Interject
If you hold Shift then drag an independent node (not connected to any other node) over a connection and release the mouse, the node will interject itself between the 2 nodes of the existing connections.
Replace Node
Right-click any node, select Replace Node and type in the name of another node. The selected node will be replaced with that node. If the connections match, they will be kept with the new node. If any port names don't match, a Chokepoint will be created to temporarily hold the connection so you can reroute them manually.
Get Name from Parent
Sometimes you have many outputs and you have to spend time naming them properly. Then you need to add auxiliary outputs for those, such as normals or data maps, and it can become a giant chore to name them all.
The new Get name from parent command in the node context menu can get the name of the parent and add the node's own name as a suffix. For example, Slope becomes "Erosion_Slope".
Connection Management
Out-to-out quick connections
When you drag an output connection to another output connection, a Combine node is created with the 2 ports serving as the inputs for the Combine node.
MultiMix
Select 2 or more nodes and click the MultiMix button. Alternatively, you can press F8. This will instantly create a sequence of Combine nodes to mix the selected nodes together. For more detailed control, you can select 2 at a time and multimix the results.
Connect Menu
The Connect menu lets you quickly connect any port to an available portal. Select a node and press C to bring up the menu.
Disconnect Menu
The Disconnect menu lets you quickly disconnect any port or even remove a portal. Select a node and press X to bring up the menu.
Navigation
Navigating a complex graph can be a tedious process. You can use the following conveniences to make this a lot easier.
Navigate Menu
The Quick Navigate menu can be brought up by selecting a node and pressing ,. You can then navigate to any connected nodes, including portals from other graphs.
Node Bookmarks
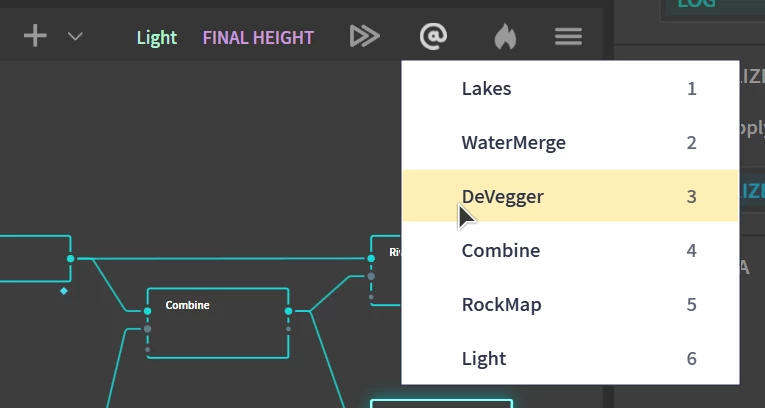
You can bookmark nodes that you go to frequently. Right-click a node and select Mark as Favorite. You can then access all bookmarked nodes from the favorites/bookmarks menu in the graph toolbar. You can also use Keyboard Shortcuts 1-9 to access the top 9 nodes.
Auto Layout
Even the most complicated graphs can be automatically organized. Just press F4 in the graph.
Pressing F4 once will layout the graph in a linear pattern. Pressing F4 again lays out the graph in a waterfall pattern. In the waterfall pattern, Gaea will intelligently try to figure out the junctions in the graph and stagger the subsequent nodes accordingly.
You can layout portions of a graph by selecting the nodes you want to organize. If no node is selected, the entire graph will be organized.
Properties Drag OutWhile Gaea will try to organize the graph as efficiently and tightly as possible, it cannot anticipate all patterns. It is recommended that you apply auto-layout to portions of the graph at a time - especially those with separate concerns or several branches - to prevent your entire graph from becoming organized too tightly.

Official Website | Discord | YouTube | Instagram | LinkedIn
This documentation is licensed under the MIT License, a very permissive open-source license.